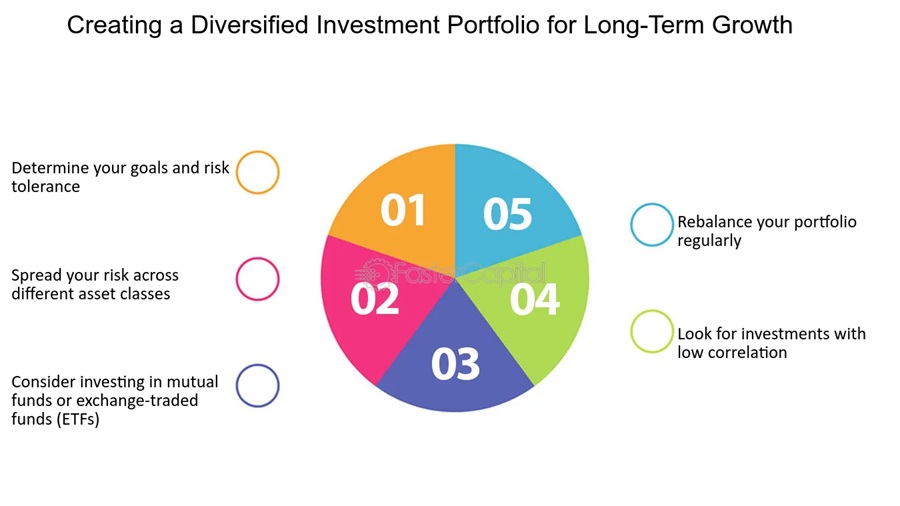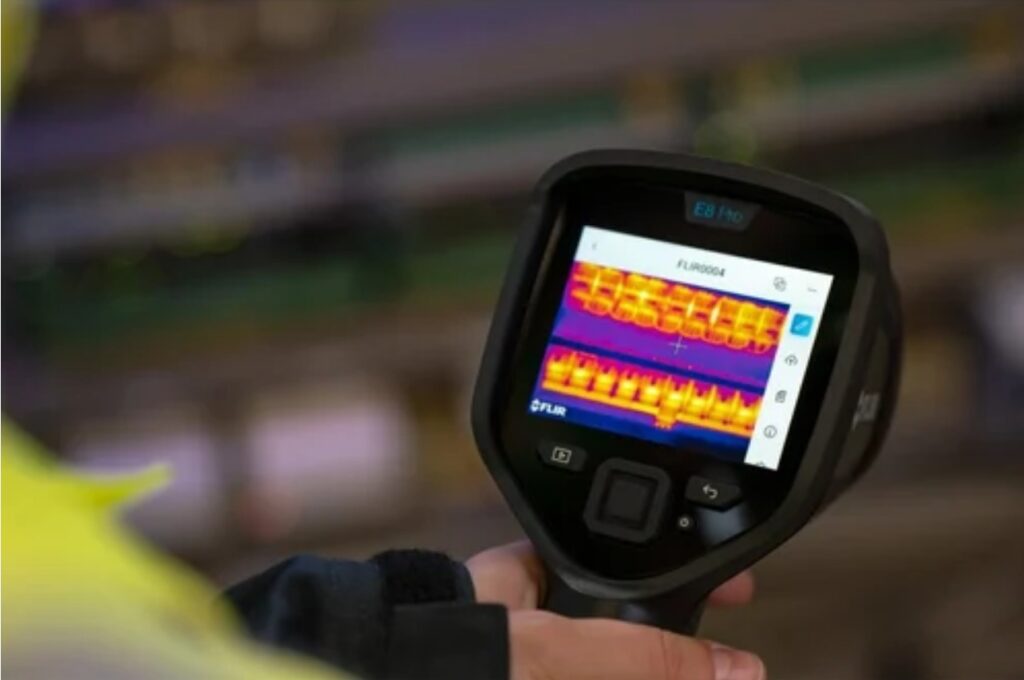
Industrial teams don’t lose money because a motor “suddenly” fails or a breaker “randomly” trips. Most of the time, the warning signs were there first—an overheated lug, a dragging bearing, a refractory weak point. The problem is simple: the human eye can’t see heat patterns.
Incorporating infrared thermal cameras into your inspection routine can significantly enhance the accuracy and efficiency of identifying potential issues. For instance, when dealing with high-temperature equipment, such as furnaces, these cameras can detect heat anomalies that might indicate underlying problems. This is particularly useful in industries where maintaining optimal equipment performance is crucial. If you’re in need of specialized services, consider reaching out to experts in furnace repair Chesterfield, who can provide tailored solutions to ensure your systems are running smoothly. By leveraging advanced technology and professional expertise, businesses can minimize downtime and extend the lifespan of their equipment, ultimately leading to cost savings and improved operational reliability.
That’s why an infrared thermal camera has become a practical tool for maintenance, reliability, and EHS teams. A thermal imager detects infrared energy emitted or reflected by objects and converts it into a thermogram (a heat map).
Where thermal imaging pays off in businesses
Plants usually see fast value in:
- Predictive maintenance: Early fault detection means fewer emergency jobs and more planned shutdown work. Tempsens describes portable thermal imagers as a predictive maintenance tool for maintenance activities across industries.
- Electrical inspections: Substations, switchyards, MCCs, busbars, and terminations are common targets because heat often appears before failure.
- Process and quality control: Furnace monitoring, refractory lining checks, ladle monitoring, and process control benefit from non-contact temperature profiling.
- Energy-loss hunting: Thermal imaging is widely used to spot abnormal temperature patterns that point to leaks, losses, and inefficiencies—helping reduce costs and improve energy use.
How an infrared thermal camera “measures” temperature (and why readings drift)
Every infrared camera measures the intensity of infrared radiation incident on its detector and converts that signal into temperature values. But it also receives radiation reflected from the surroundings and radiation from the atmosphere along the path. That’s why surfaces, distance, and viewing angle matter as much as the camera.
The 6 selection factors that actually matter on-site
1) Temperature range + accuracy
Match the camera to your operating envelope. For general maintenance, you may stay in lower ranges, while furnaces and hot zones need high limits. Tempsens’ ThermCAM-HT, for example, lists 700°C–1800°C (with other ranges available on request). Many models state accuracy like ±2°C or ±2% of reading.
2) Resolution and optics (spot size at distance)
Resolution (256×192, 384×288, 640×480) affects detail, but the lens and geometry decide whether you can isolate a small hotspot from a safe distance. FLIR summarizes Distance:Size (D:S) like this:
SSR = Distance / Spot Size.
Ask vendors to prove this on your smallest real target (for example, a cable lug). Tempsens’ ThermCAM-384 lists multiple lens options (wide to telephoto), which is exactly what you need when “safe distance” is non-negotiable.
3) Thermal sensitivity (NETD) for subtle faults
NETD is the smallest temperature difference the camera can distinguish—useful for early-stage bearing friction, insulation stress, or uneven heating before it becomes obvious. ThermEye 256M lists NETD <40 mK.
4) Emissivity and reflections (critical for metals)
Emissivity is the efficiency with which a surface radiates heat. Shiny metals can have very low emissivity and behave like mirrors, so your camera may “see” reflected heat instead of true surface temperature.
Field fix: measure on a high-emissivity reference spot (matte tape/paint/oxidized area) and set emissivity properly. Many Tempsens cameras show an emissivity range of 0.01 to 1.0.
5) Focus and measurement tools
Poor focus blurs edges and can hide smaller hotspots. If your team inspects varied distances, manual focus can be an advantage (ThermEye 256M lists manual focusing).
Measurement overlays—points, lines, areas, hot/cold tracking, alarms—help turn images into decisions, not just “nice visuals.”
6) Ruggedness + integration
For daily use, check IP rating, shock/vibration tolerance, and how quickly technicians can produce a repeatable report. For installed or “always-on” use, connectivity matters—Tempsens notes integration into monitoring software/industrial systems, and ThermCAM-384 supports Ethernet connectivity for PC monitoring.
How Tempsens can fit a practical plant standard
Instead of one “do-everything” unit, many plants standardize a small set:
- Portable inspections: ThermEye 256M (256×192, manual focus, point/line/area measurements) for routine electrical and mechanical rounds.
- Online/critical assets: ThermCAM-384 (optional 384×288, up to 30 Hz, multiple lenses, Ethernet, IP65) for continuous monitoring, early fire risk zones, or process control.
- High-temperature process zones: ThermCAM-HT for high-temperature operations; it also uses a short-wavelength band intended to reduce certain physical errors linked to emissivity inaccuracies.
Common mistakes to avoid (quick wins)
- Chasing absolute numbers on shiny metal: control emissivity and watch reflections first.
- Standing too far away: confirm D: S/spot size so the hotspot isn’t averaged out.
- Comparing scans under different loads: log current/throughput where possible; trends beat one-off readings.
A rollout that works beyond the first demo
- Baseline first: capture “normal” signatures for major assets.
- Standardize method: same distance, angle, and load condition improves repeatability.
- Define actions: every anomaly should end in a decision—monitor, schedule repair, or isolate safely.
Used this way, an infrared thermal camera becomes a reliability habit: quicker diagnosis, fewer surprises, and safer inspections.